CoolCroco user manual
CoolCroco decodes a whole folder to display resolution on background workers and keeps it in RAM. After the first pass, moving through a shoot in either direction is instant - nothing is re-decoded, nothing is flushed. Everything here is built around that: look, decide, press one key, move on.
Installing
Windows
The Microsoft Store build is the easy one: verified by Microsoft, one click, and it keeps itself updated. The standalone installer from the download page works just as well, but Windows SmartScreen may say the publisher is unknown - there is no code-signing certificate behind it yet. Choose More info, then Run anyway. The installer needs no administrator rights and can add a desktop shortcut and Open with → CoolCroco for image files.
macOS
Open the .dmg and drag CoolCroco to Applications. On first launch, right-click the app and choose Open. If macOS says it is damaged, that is only Apple's quarantine flag: open Terminal, type xattr -cr followed by a space, drag the app onto the Terminal window and press Enter. It opens normally after that.
Linux
The AppImage needs no install. Make it executable - chmod +x, or right-click → Properties → Allow executing - then double-click it.
How much memory it uses: CoolCroco claims 90% of system RAM, kept between 4 GB and total minus 8 GB - roughly 56 GB on a 64 GB machine, roughly 8 GB on 16 GB. That budget is shared between the display cache, the full-resolution cache and thumbnails, and the figure is printed on the status line at startup.
Opening photos
| Ctrl+O | Open image files. This is the only picker that shows thumbnails, so it doubles as a browser: pick one photo to open its whole folder positioned on that photo, or select several to open just that set. |
| Ctrl+Shift+O | Open a folder, when you already know which one you want. |
| Drag and drop | Drop images or a folder anywhere on the window. |
| From the file manager | Double-click a registered image type, or use Open with → CoolCroco. Files opened while CoolCroco is already running join the gallery you have open. Right-clicking a photo or a folder in Windows Explorer also offers Open in a new CoolCroco window, for a second shoot beside the one you are culling rather than instead of it. |
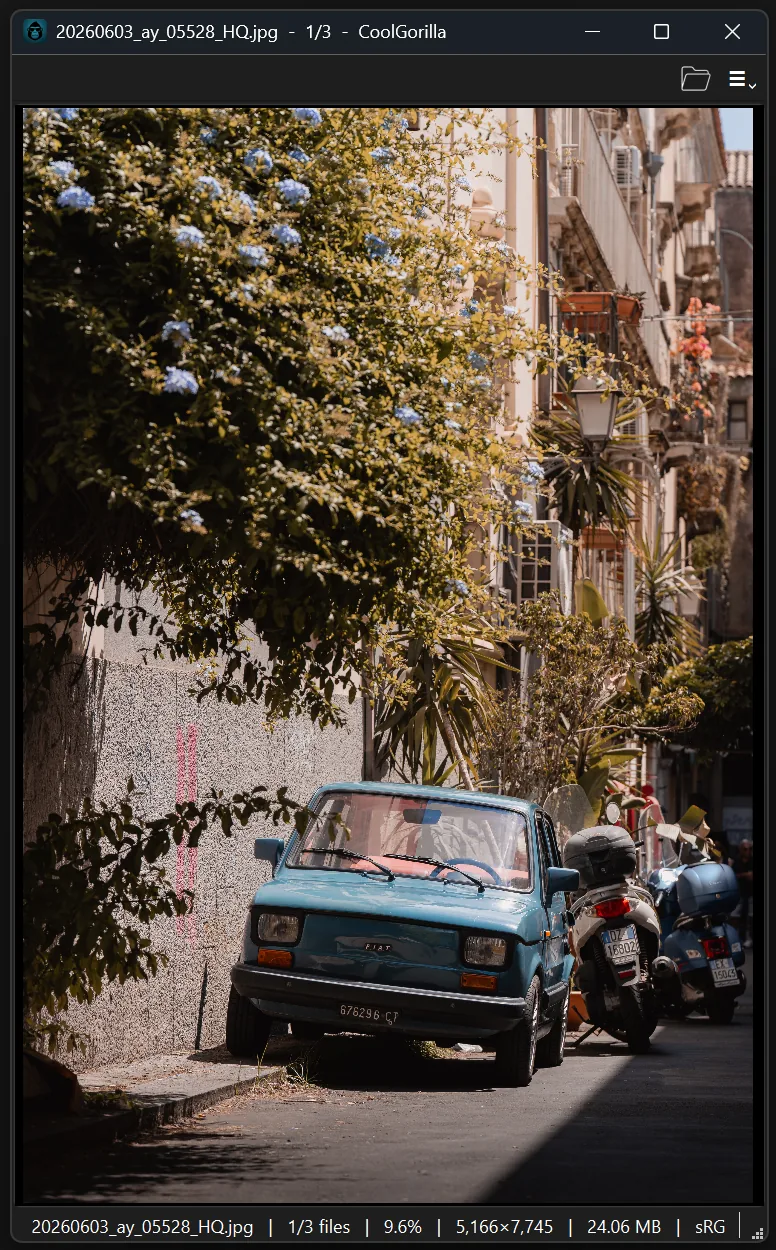
The window sizes itself to the first photo it shows, so a set of portrait frames opens in a portrait window rather than a letterboxed one.
What it opens
RAW from every major brand through LibRaw - Sony, Canon, Nikon, Fujifilm, Olympus, Panasonic, Pentax, Leica, Hasselblad, Phase One, Sigma, Kodak, Minolta, Mamiya, Leaf, Epson and Samsung - plus JPEG, PNG, TIFF, WebP, BMP and the HEIC files an iPhone shoots by default. Straight from the card, no conversion. SVG drawings open too, drawn at a size worth looking at rather than at whatever the file happens to declare.
The window
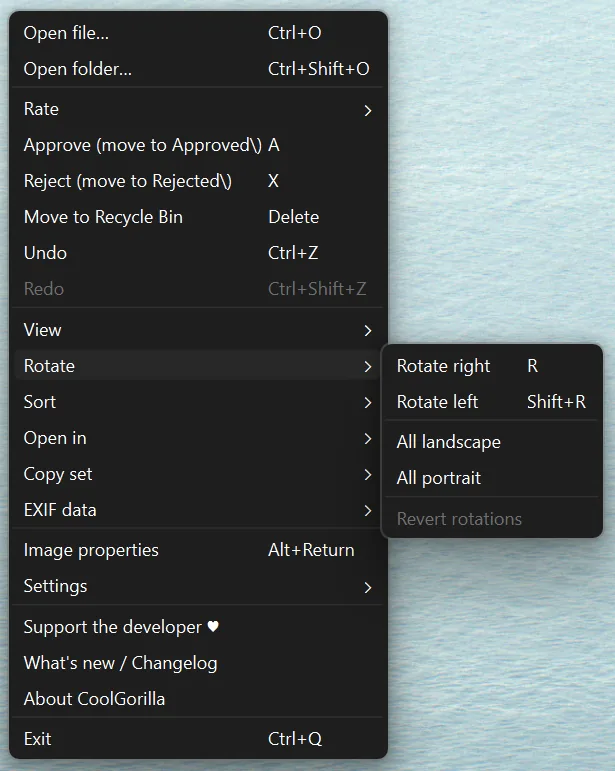
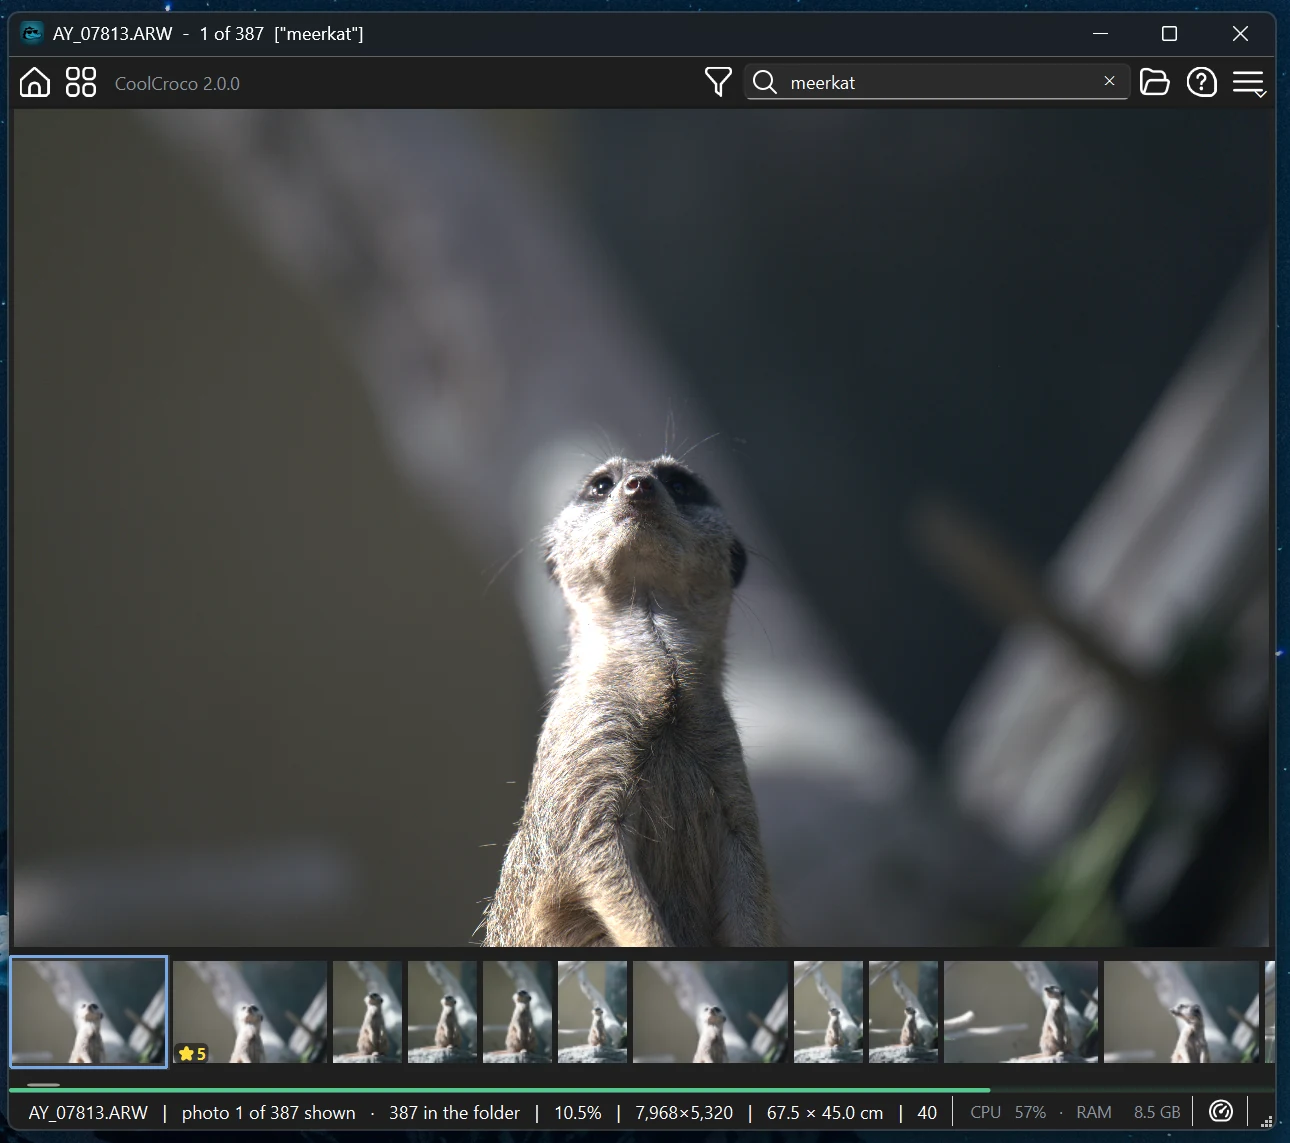
The title bar carries the file name and your position in the shoot. Top right are two controls: a folder button that opens files, and the menu button - the same menu you get by right-clicking anywhere on the photo.
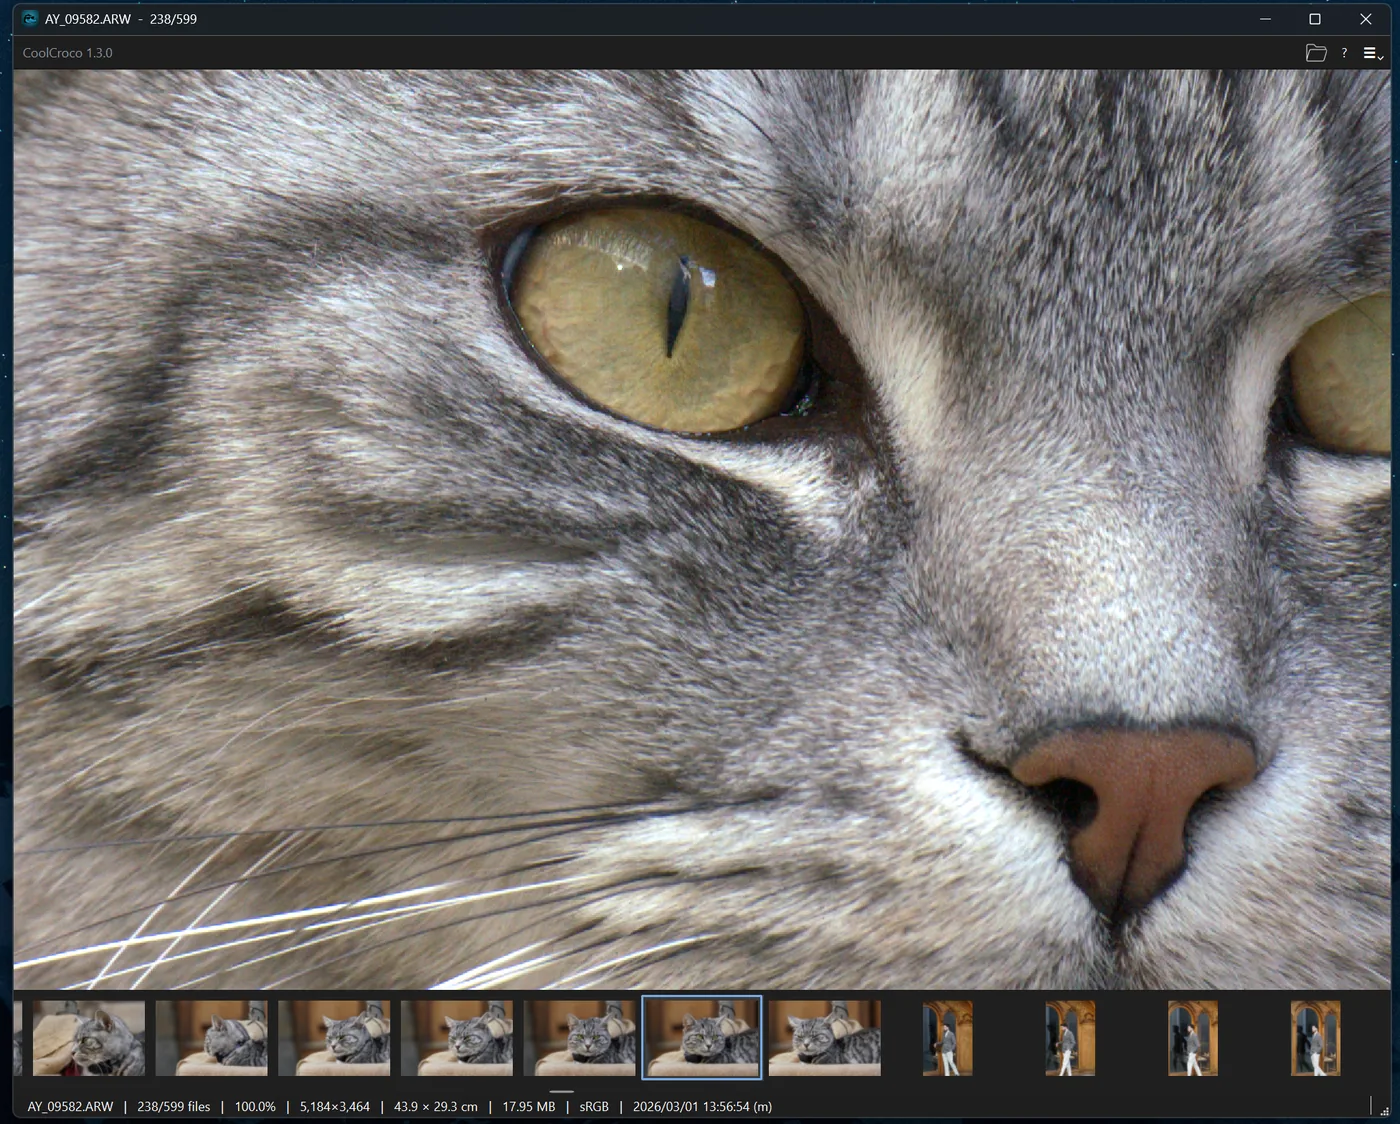
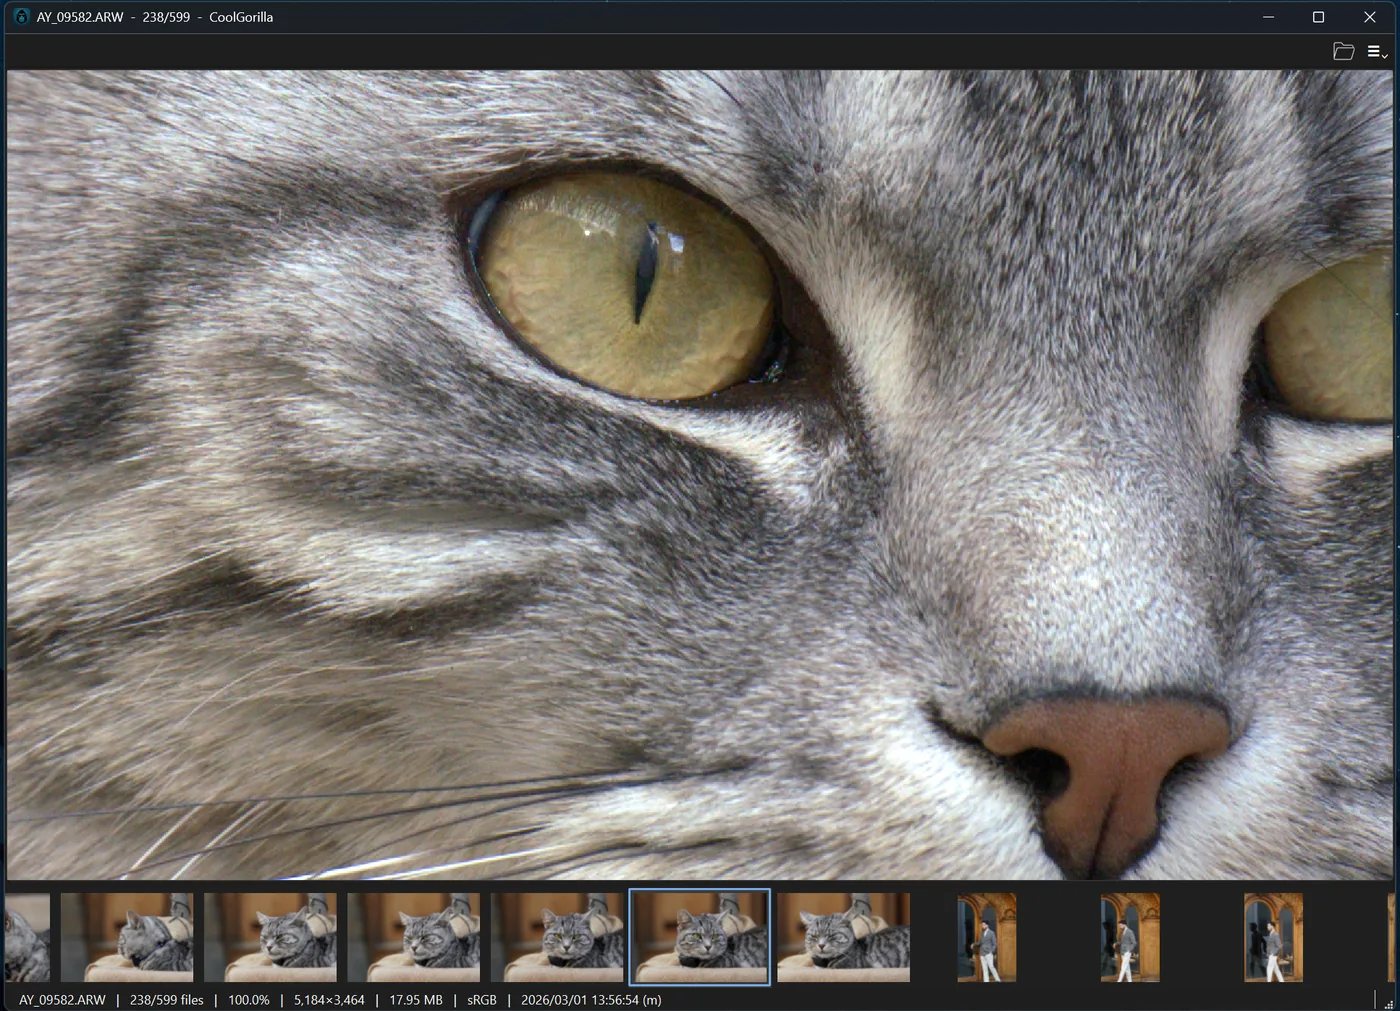
Along the bottom, the detail bar reads out the photo you are on:
| Name | File name, with a gold star in front while the photo is on the clipboard |
| Position | Which photo of how many |
| Zoom | Scale against the photo's real pixels - 100.0% is true 1:1 |
| Pixels | Native dimensions, for example 5,184×3,464 |
| Print size | What that measures on paper at your chosen resolution |
| File size | Megabytes on disk |
| Date | Modified date, marked (m) |
The bar is laid out in columns of a fixed width, so each fact keeps its own place from photograph to photograph and you can watch one number change without chasing it along the bar. Anything too long for its column ends in … and shows in full when you hover it - and hovering the file name shows the photo's full path, which the bar has never had room to print.
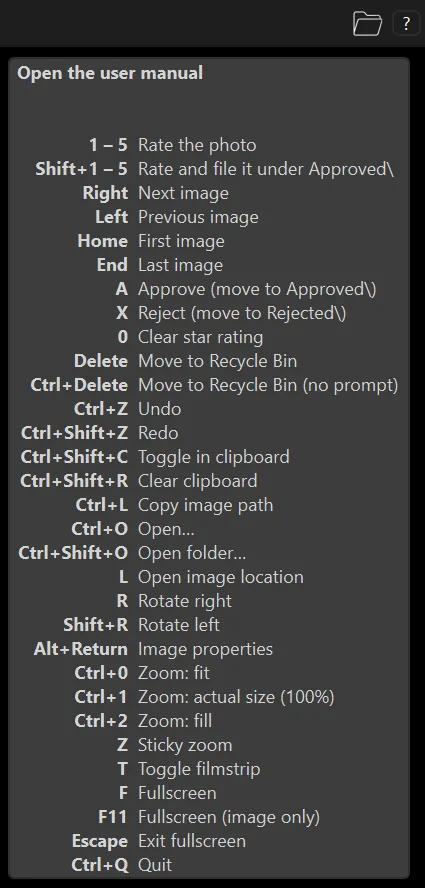
Hovering the ? button in the toolbar lists every key, built from your own bindings, so it tells the truth after you rebind something.
Below the photo sits the filmstrip of thumbnails. Drag the divider above it to make it taller or shorter, drag its scrollbar or flick it to travel through a long shoot, and click any thumbnail to jump there.
G gives the whole folder at once: the strip fills the window as a grid, the photograph steps aside, and everything you do to a photograph still works - rate, approve, reject, undo, right-click for the same menu. It is the same filmstrip, so there is no second list of photographs that could disagree with the first. G again brings the photograph back, and so does double-clicking a frame.
A slider appears at the bottom right while the grid is up, and Ctrl and the wheel do the same thing with the pointer over the sheet: bigger cards and fewer of them, or smaller cards and the whole shoot in one screen. Where you leave it is remembered, because how many photographs you want at once is a way of working rather than a setting. The frame you were on is kept in view as the cards resize.
The strip does not have to live at the bottom. Shift+T walks it round the window - left, top, right, bottom, and round again - and Ctrl+Shift+T walks it back. Down a side is the shape to use for an upright shoot: a portrait frame on a wide screen leaves a third of the window empty on either side, and a strip down the side takes room that was doing nothing.
The folder browser
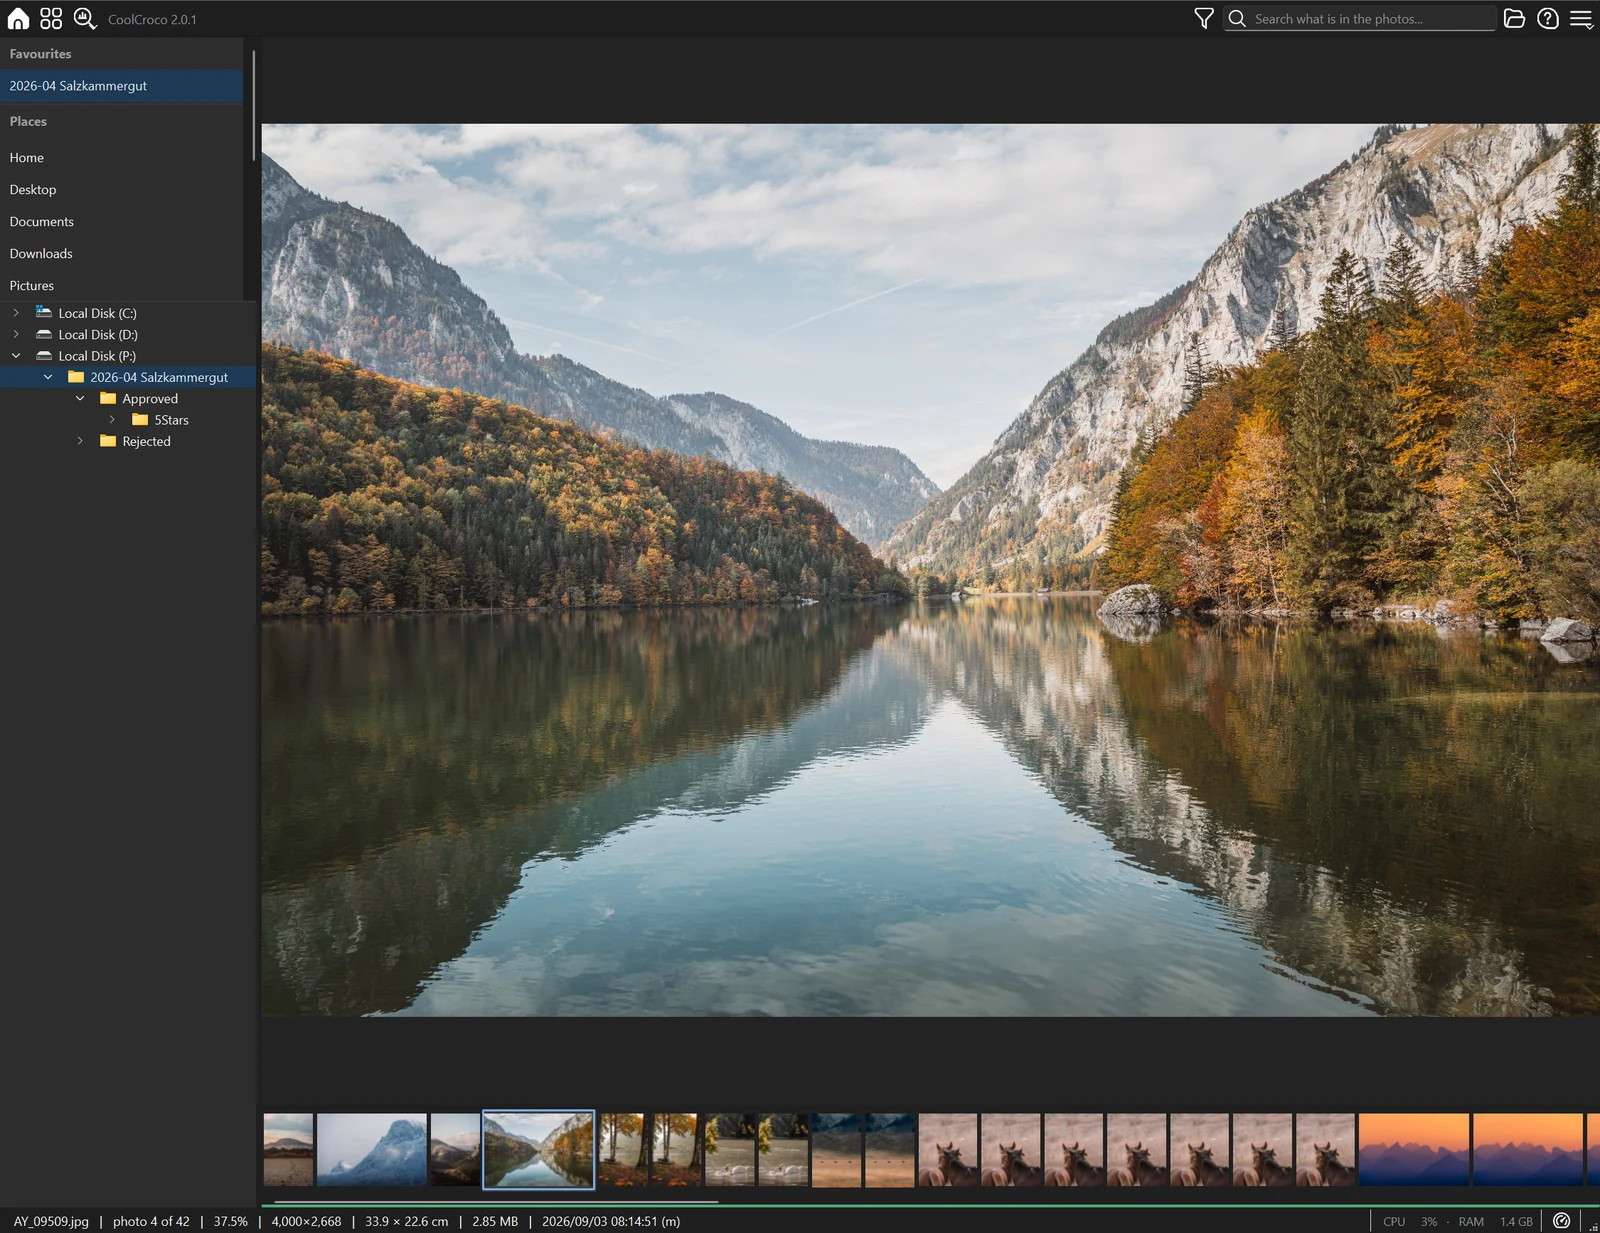
The button at the far left of the toolbar, or Ctrl+B, opens a folder tree down the left-hand side. Click a folder and CoolCroco opens it - one click, the way Bridge and Lightroom do.
What it is most useful for is the folders CoolCroco itself makes. A cull fills Approved, Rejected and Approved\5Stars right beside the shoot, and until now the only way back into them was a file dialog. They are sitting there in the tree.
Drag the divider to resize it; it remembers its width. It opens closed every time, because the photo is what the window is for. The tree follows along, so it always shows where you are however you got there.
The shortcuts above the tree
A tree can only be walked down from a drive letter, and the three folders anybody actually opens are nowhere near the top of one. So above it sits a short list, in the order you reach for them.
| Favourites | Folders you pinned yourself. Right-click any folder in the tree and choose Add to favourites; right-click it again, in the tree or in the list, to take it off. A new one goes on the end, so the list keeps the shape you have learned. The section is not there at all until you pin something. |
| Places | Home, Desktop, Documents, Downloads, Pictures and Videos, as your computer knows them - so a machine running in German lists Schreibtisch, and a Windows machine whose Pictures folder has been moved into OneDrive lists the one that is really there. |
| Recent | The last few folders you opened, newest first, without going to a menu for them - going back to yesterday's shoot is the most repeated thing anybody does here. A folder you have pinned is not listed twice. |
| Locations | Every disk and card that is plugged in, by name: a card reader shows the card's own label, which is the row you are looking for. This is the section that changes while you watch, so it is re-read every time you open a folder. |
Clicking a row opens that folder, exactly as clicking one in the tree does, and the row you are inside stays highlighted - the deepest one, so a shoot in Pictures highlights Pictures rather than Home. A hairline separates each section from the next, and one more separates the whole list from the tree.
The tree tidies itself. Open a folder and the branches you are not in fold away, leaving the way down to where you are and nothing else. What stays open is the folder you just opened - its Approved and Rejected are the reason the tree is here - and everything above it, so the row never folds away from under the click that opened it.
Right-click a folder
| Open including subfolders | Pick how far down to go - 1, 2, 3 levels, or all the way - and everything under the folder opens as one gallery. This is how you look at a shoot together with its Approved and Rejected. The filmstrip draws a gold seam where one folder ends and the next begins, with the folder name beside it. |
| Open in a new window | Go and look at another folder without giving up the one you are part way through. |
| Set as desktop background | Windows only reads JPEG, PNG and BMP, so a RAW is written out as a JPEG first, into Pictures\CoolCroco Wallpapers, named after the frame. Nothing in that folder is ever deleted. |
| Copy image · Copy shooting settings | Copy image puts the photograph itself on the clipboard rather than the file - for a RAW it is the only way to get the picture out without exporting one. Copy shooting settings gives you the body, lens, focal length, shutter, aperture and ISO as text. |
| Add to favourites | Pin the folder to the list above the tree, where it stays until you take it off. Offered right where you are already pointing at the folder you want kept. |
| New folder… | Make a subfolder to file things into by hand. Renaming and deleting folders are deliberately not offered - one slip in a tree is not worth the shortcut. |
Opening a whole tree is a big ask: CoolCroco stops at 100,000 photos and tells you it stopped, so a stray all the way down on a drive cannot quietly turn into a gallery nobody can cull. Clicking a folder never writes anything and never clears your undo history.
Moving through a shoot
| → PgDn ↓ Space | Next photo |
| ← PgUp ↑ | Previous photo |
| Home · End | First · last photo |
| G | Grid - the whole folder at once, and back |
| T | Hide or show the filmstrip |
| Shift+T · Ctrl+Shift+T | Move the filmstrip round the window, and back the other way |
| F | Fullscreen, filmstrip kept |
| F11 | Fullscreen, image only |
| Esc | Leave fullscreen - or quit, if you are not in it |
Navigation stops at the ends of the folder. The first time you walk off one, CoolCroco asks whether it should loop round to the other end and remembers your answer. A cold folder shows each photo's embedded preview immediately and sharpens to the real decode a moment later, so there is never a black frame to wait through.
Zoom, pan and sticky zoom
| Wheel | Zoom towards the cursor |
| Double-click | Toggle native 100% at the cursor, and back to fit |
| Drag | Pan the zoomed photo |
| Ctrl+0 · 1 · 2 | Fit · actual size (100%) · fill |
| Z | Sticky zoom |
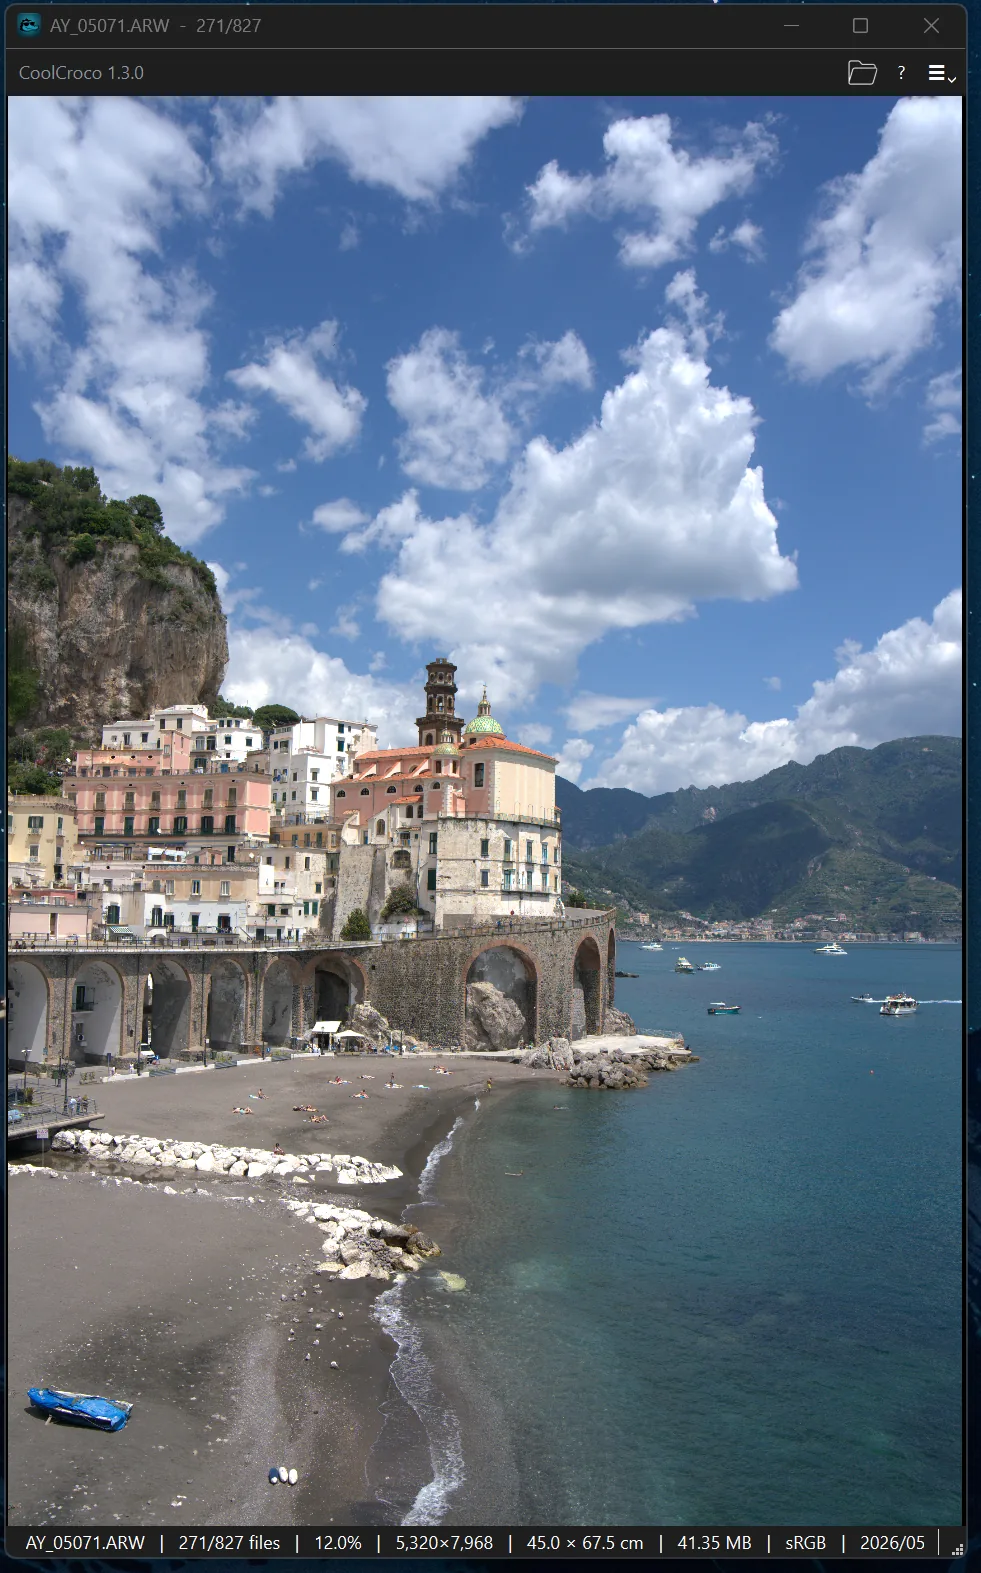
Past fit, CoolCroco decodes the photo again at full resolution, so 1:1 really is 1:1 - which is what you want when you are checking focus on a RAW file.
Sticky zoom is for bursts. Zoom into the eye of the first frame, press Z, then arrow through the sequence: every frame of the same size holds the same crop, at full resolution, so you can compare the same detail across ten shots without touching the mouse.
Sorting
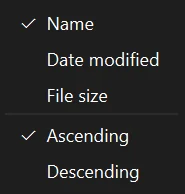
Menu → Sort orders the gallery by name, date modified or file size, ascending or descending, and remembers your choice. Star-rated photos always group at the front of the filmstrip - five stars first, down to unrated - whatever sort you pick; the sort orders photos within each of those groups.
Speed and memory
CoolCroco keeps photographs in RAM. That is the whole reason moving through a shoot is instant rather than a wait per frame, and it is why the app asks for a large share of the memory on the machine. Two things in the window are about that.
The green line
A hairline runs along the outer edge of the filmstrip - under it when the strip is along the bottom, outboard of it when the strip is down a side, and along the bottom of the window when the strip is hidden. It fills as the folder is read into memory, so you can see at a glance whether the next frame will appear at once or take a moment.
What counts as full depends on the read-ahead setting. Normally the line measures the neighbourhood - as far either side of the photo on screen as the memory can hold - so a full line means flipping around where you are working is instant, whether or not the rest of a huge card has been read.

The speedometer
At the right-hand end of the status bar, and in Menu → Settings → Preview quality and memory for anyone who never noticed it. It has two dials, and it turns blue whenever either of them is off its default, so a folder behaving unusually explains itself.
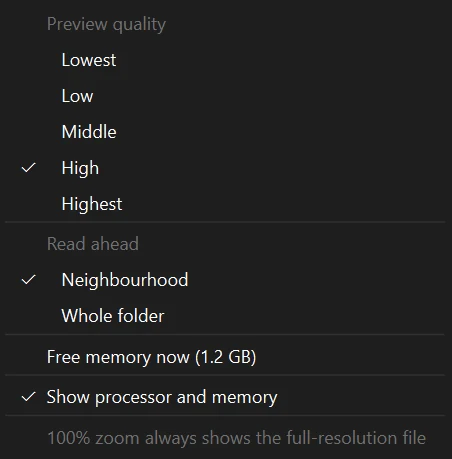
Preview quality has five steps, from Lowest to Highest, and sits on High. At the two lowest steps a RAW is read from the preview the camera wrote inside it - a few hundred kilobytes instead of the whole file. Middle and High develop the RAW at half size, which is sharp at any sensible fit on a 4K screen. Highest develops it in full.
It matters most on a slow SD card or card reader, where the time a photograph takes is the time it takes to read off the card. Zoom to 100% and you get the full-resolution file at every one of these settings - nothing on this dial decides how sharp your photographs are, only how quickly they turn up.
The second thing a smaller preview buys is memory. A photograph at half the width costs a quarter of the RAM, so far more of the shoot stays in memory at once and the green line goes further on the same machine.
What it is costing
Beside the speedometer, in dim grey, sits CPU and RAM. The processor figure counts every core on the machine, the way Task Manager does. The memory figure is what is really resident - mostly the photographs being held. Both are a tick box on the speedometer menu if you would rather have the room back.

Read ahead is either Neighbourhood or Whole folder. Neighbourhood is the default: read as far either side of the photo on screen as memory allows, then stop. Whole folder reads everything, which is worth having when the shoot fits, because then nothing ever waits. Dropping the preview quality is what makes a big card fit.
Getting the memory back
A folder you have left is let go of on its own, half a minute after you open the next one. Opening the wrong folder and coming straight back inside that costs nothing; a shoot you have finished with does not sit in memory for the rest of the afternoon.
CoolCroco watches the machine, not just itself. Once about three quarters of your RAM is in use by anything - Lightroom opening beside it, an export running - it starts handing photographs back, taking the frames furthest from the one you are looking at first and never the ones either side of it. It gives up a slice at a time, so a program that needs memory for a moment does not cost you the folder, and it stops as soon as the machine has room again.
Free memory now, on the speedometer menu, does not wait and does not spare the folder you are in. The label says how much it would hand back. The photograph on screen stays exactly where it is, and the frames either side of it are read again as you move - so it costs you the green line and nothing else. Use it when something else on the machine needs the room.
Star ratings
Press 1 to 5 to rate the photo you are looking at; 0 clears the rating. The view moves on to the next photo by itself, and the one you just rated files into its star group at the front of the strip, where its stars show under the thumbnail.
Ratings are written as XMP sidecar files - IMG_0001.xmp next to IMG_0001.ARW - using the same xmp:Rating field Lightroom, Bridge and Capture One read and write. Rate here and the stars are already there when you import; stars set there show up here. The photo itself is never rewritten, so a proprietary RAW is never at risk.
Rate and file, in one keystroke
Hold Shift with a rating - Shift+1 through Shift+5 - and the photo gets that star and moves straight into an Approved\5Stars folder (or 4, 3, 2, 1) beside where it lives now. The rating travels with it, and the view moves on.
Use plain 1–5 when the stars are notes to come back to, and Shift+1–5 when the star is the decision: a shoot sorts itself into star folders as you go, with nothing left to move afterwards.
Ctrl+Z undoes the whole thing at once - the photo comes back to its folder carrying whatever rating it had before you pressed the key. It works on a photo that already has that rating too: pressing Shift+3 on a three-star photo is a request to move it, and it moves.
Filing a whole star group
Right-click any rated thumbnail in the filmstrip and you get two actions for its entire rating tier: move all of them to the matching Approved folder, or copy them there instead - the originals stay exactly where they are, keeping their stars, so you can assemble a print set without emptying the folder it came from. Both are a single undo, and copying the same group twice never overwrites: the second copy lands beside the first.
Picking out a group
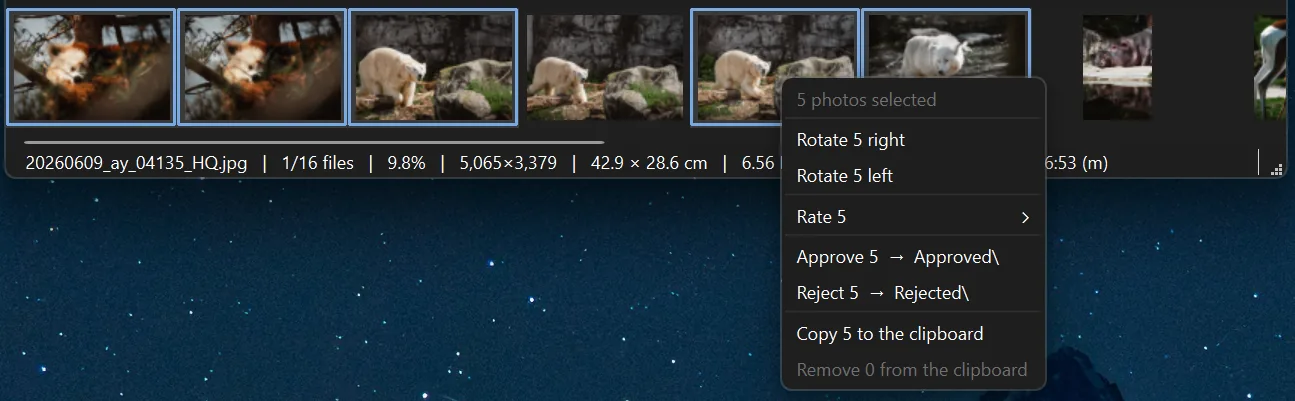
Ctrl-click thumbnails in the filmstrip to pick out several, Shift-click to take a run of them, or press Ctrl+A to pick out every one - in the strip or the grid view, and among the frames of the sequences and duplicates window. A plain click still just moves to that photo, so nothing changes until you reach for a modifier.
Right-click the group and everything applies to all of it at once - rotate left or right, rate, approve, reject, or put the lot on the clipboard. Each one counts as a single Ctrl+Z: turning twelve frames costs one undo, not twelve. The group survives the action, so a mixed album can be worked through in one motion.
The keyboard follows the group too. With one picked out, 1 to 5 rates all of it, 0 clears all of it, A and X file all of it, R and Shift+R turn all of it, and Ctrl+Shift+C puts all of it on the clipboard. Delete asks once for the whole group rather than once per photo. With no group picked out, every key does what it always did.
Filing a whole star group
Right-click any rated thumbnail in the filmstrip and you get two actions for its entire rating tier: move all of them to Approved\nStars, so they leave the folder and the gallery, or copy all of them there instead, leaving the originals exactly where they are with their stars intact.
Both are a single undo. Undoing a copy removes the copies and leaves the originals alone. Copying the same group twice never overwrites: the second copy lands beside the first with a number added to its name.
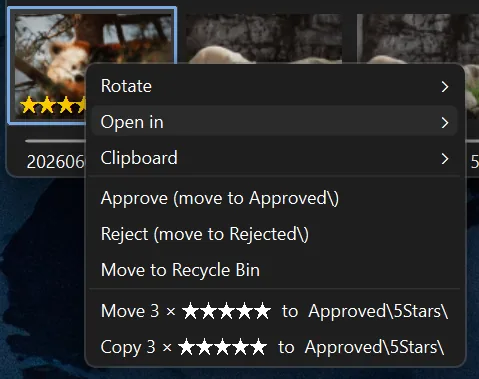
Approve, reject, delete - and undo
| A | Move the photo into an Approved subfolder |
| X | Move it into a Rejected subfolder |
| Delete | Move it to the Recycle Bin - this one asks first |
| Ctrl+Z | Undo the last thing you did to a file |
| Ctrl+Shift+Z | Redo it |
Approve and reject are deliberately non-destructive: the subfolder is created next to the photo and the file is moved, not copied or deleted. Its rating sidecar and any EXIF backup travel with it. A and X sit next to each other so one hand can cull while the other holds the coffee.
Undo steps back through everything you did to files in this session: ratings, approve and reject, rate-and-file, group moves and copies, rotations, and EXIF removal. A photo that has left the folder by other means - you moved it yourself, or emptied the subfolder - is skipped rather than failing loudly.
The clipboard
The clipboard is a running selection you paste somewhere else.
| Ctrl+Shift+C | Add the current photo to the set, or take it out again. Photos in the set carry a gold star on their thumbnail. |
| Ctrl+V | In Explorer or Finder: drops every file you collected. The clipboard is rewritten each time you add one, so it always holds the whole set. |
| Ctrl+Shift+R | Empty the set and clear the clipboard |
| Ctrl+L | Copy the current photo's full path as text |
Dragging photos out
You can pull a photo straight out of CoolCroco and into whatever is behind it - Photoshop to open it, a browser upload box to post it, an email, a folder in Explorer. No copying to a staging folder first, and no clipboard in between.
| Drag the photo on screen | Whenever it is not zoomed in. Zoomed past fit the drag still pans, because that is what you need it for while you are checking focus. |
| Drag a thumbnail across the filmstrip and out of it | Up or down off a strip lying along the top or bottom, sideways off one standing up the side. Dragging along the strip still flicks it, so the two never get in each other's way. |
With a group picked out, dragging any of it carries all of it, and the group stays picked out afterwards. Drag a thumbnail that is not in the group and only that one photo goes.
The drop is always a copy. Nothing you drag out can move or delete the original, whatever the program you drop it on would normally do - your photos stay in the folder you are still culling. If a drop does nothing at all, check whether the other program is running as administrator while CoolCroco is not: Windows refuses drags between the two without saying so.
Timelapses, bursts and brackets
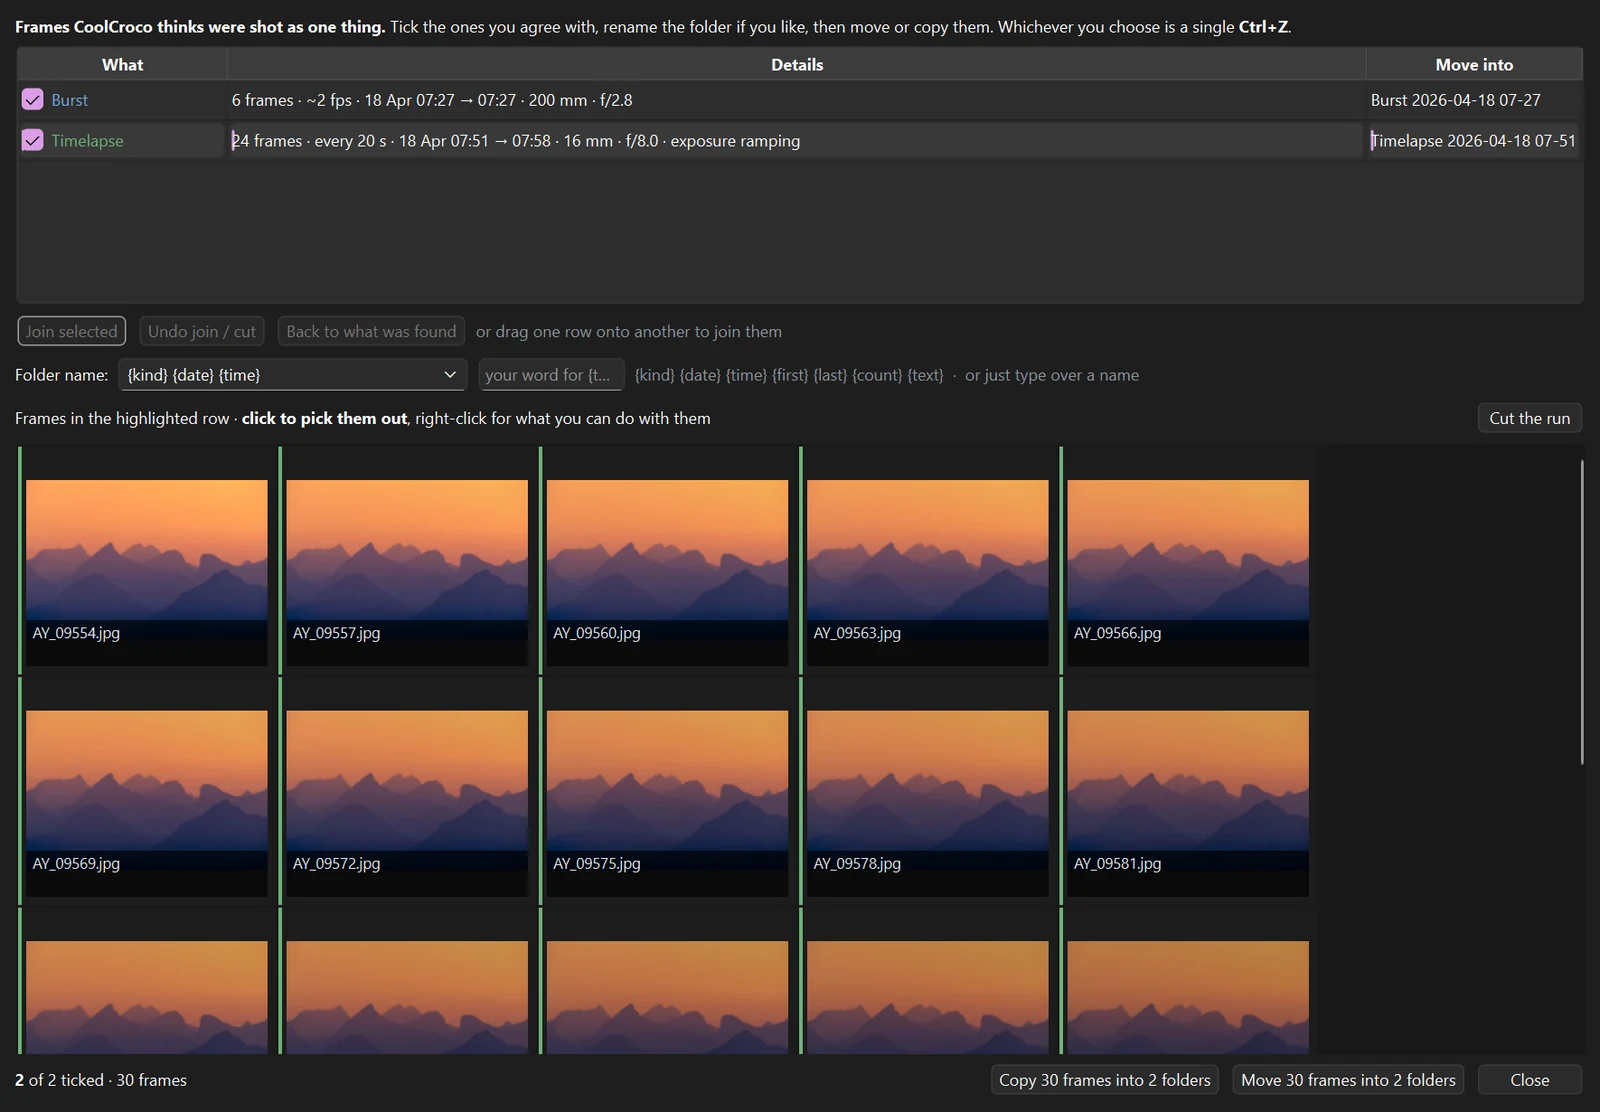
Analyse → Find sequences looks through the shoot for frames that were taken as one thing - a timelapse on an intervalometer, a burst off the continuous drive, a bracketed set - and offers to file each one into its own subfolder.
A run is recognised by its interval and by the camera staying put: same body, same lens, same focal length, same aperture. A twist of the zoom ends a run, because that is a different shot. Anything faster than about two seconds is called a burst rather than a timelapse, because at that speed the one-second timestamp a camera writes cannot show that an interval was regular.
Exposure is allowed to change. A day-to-night timelapse deliberately ramps ISO and shutter across the sequence, so a slow slide is expected and the run survives it - the description says exposure ramping when it happens. Somebody changing the settings by more than two stops in one frame does end a run.
Tick the runs you agree with, then Move or Copy. Every run goes into its own folder - two runs, two folders, however many frames the button says. Copy is there for a burst you want gathered up without taking it out of the shoot. Either way, however many folders it fills, it is a single Ctrl+Z.
When it has drawn the lines in the wrong place
The detector is working from what the camera wrote down, and you were there. Two things let you overrule it, and neither one touches a file: drag one row onto another to join two runs into one, or highlight a row and click the gap between two frames in the strip below to cut one run in two. Ctrl+Z takes back one step at a time, and Back to what was found returns the whole table.
Naming the folders
The Folder name box builds every name at once from a pattern. The default is kind, date and time - Timelapse 2026-08-14 20-47 - named for when it was shot, so the name still means something a year later. The other tokens are first, last, count and your own word. Type over any single name in the table and the pattern leaves that one alone from then on.
The frames of a run can be dragged out as a whole: press anywhere on the strip and drag, and every frame goes together, straight into Sequator, Starry Landscape Stacker or whatever you stack in. Nothing moves on your card - no folder is made, no copy is written.
Finding duplicates
Analyse → Find duplicates gathers the frames that are the same photograph and shows them as a group with one picked out to keep - the six you shot as the light kept changing, the file that got copied back onto the card, the frame you re-shot because the first one was soft.
Each row keeps one frame and rejects the rest. Right-click a frame for Keep and Reject to change which, as many as you like, or right-click the row for Keep all and Reject all. Then reject or delete the others from under the table, or move whole groups into folders and decide later. Whichever you press is a single Ctrl+Z.
The keeper is a suggestion, not a verdict. One frame of each group is offered, and the window is where you change the answer. Nothing here decides which frame of six you wanted.
What it compares is the arrangement of light in the frame, not what the frame is of: each photograph is reduced to sixty-four bits recording which parts of it are brighter than which. Because that is relative brightness it is blind to exposure and white balance, so two frames a stop apart still land together - which is the point, as that is exactly the pair you are trying to choose between. It reads the pictures themselves, so it needs no model download and works whether or not you ever set up searching.
A tripod left running is not a duplicate. Frames also have to have been taken within two minutes of each other. A camera shooting all night from one spot produces near-identical frames that are a timelapse rather than a set of duplicates, and there is a finder for those above. A file copied back onto the card needs no exemption: it carries the capture time of the frame it was copied from, so the gap is zero however long ago you copied it.
There is no Copy here, and no joining or cutting of groups. Copying a set of duplicates would leave you holding the duplicates and a second set of them. And a group has no boundary to argue with the way the end of a timelapse does: two frames either are the same photograph or they are not, so if one of them does not belong the answer is to keep it, not to cut the group in half.
Filtering the gallery
The funnel button beside the search box, or Ctrl+F, narrows the folder down to part of itself - one lens, one ISO, one afternoon, the five-star frames, the portraits. The two sit together because they are the same question asked two ways: narrow this folder by what the camera recorded, or by what is in the picture.
Every box lists what this folder actually contains, with how many photos carry it. There is nothing to type and nothing to guess at, and a field the folder has only one value for is left out - filtering by the only camera present is a control that cannot do anything. The count at the bottom updates as you go.
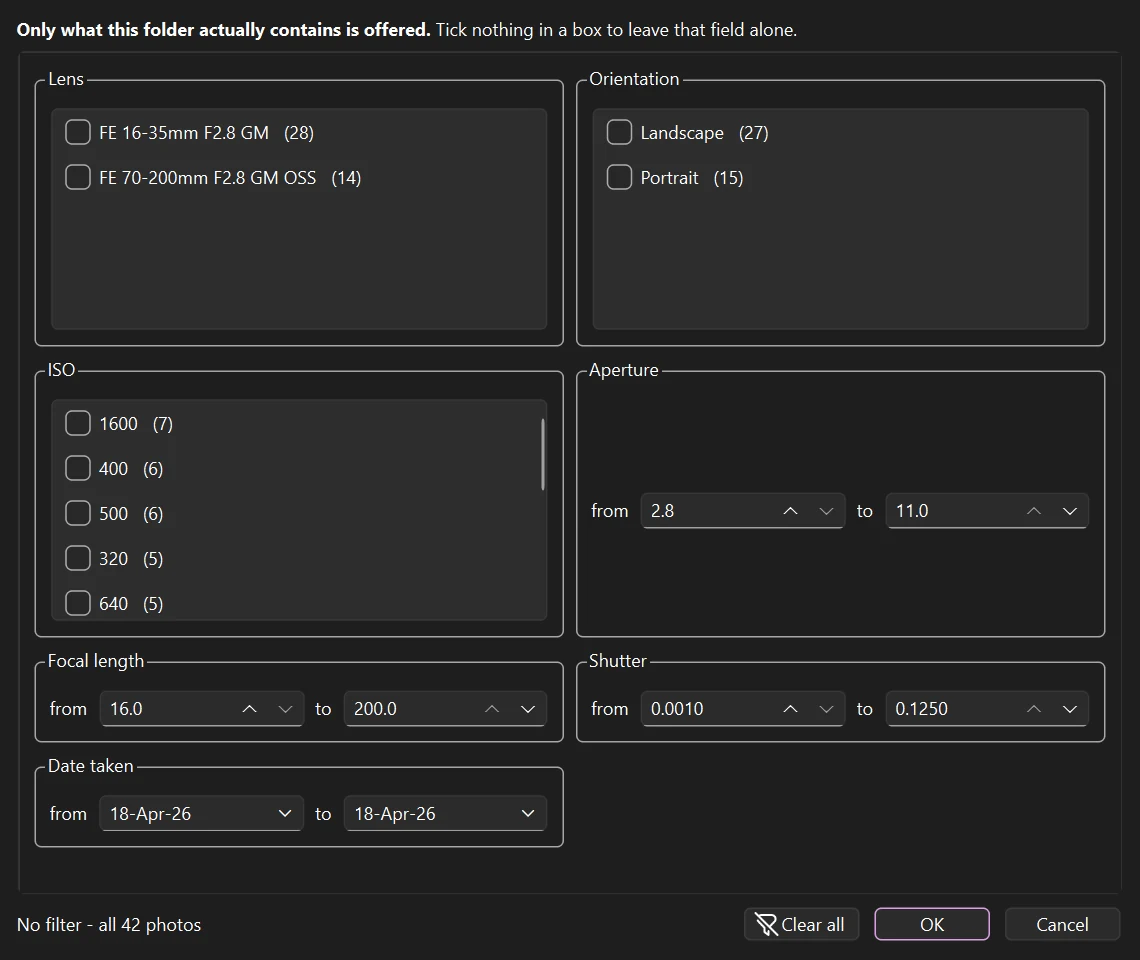
Photos that cannot answer are not shown. Ask for ISO 6400 and a file with no EXIF at all stays hidden, because it is not known to be ISO 6400 - but every box offers Unknown as a choice of its own when some files have nothing to say, so you can go and look at them.
A filtered gallery always says so - in the title bar and in the detail bar - and the funnel button lights up while it lasts. While a filter is on, everything works on what you can see and only that: rating a star group, rejecting a selection, filing a whole tier all stop at the edge of the gallery in front of you.
Keywords, copyright and the rest
Ctrl+I opens File info - the same set of fields Adobe Bridge shows: title, description, keywords, creator and contact details, location, copyright and usage terms, credit, instructions, job identifier.
Where it gets written
| JPEG, TIFF, DNG, PNG | Inside the file, so Windows Explorer's Tags column fills in and the keywords travel with a copy |
| RAW and HEIC | An XMP sidecar beside it - rewriting a proprietary RAW container risks the original for no gain, which is the same split Bridge and Lightroom make |
Your star ratings live in the same place - inside a JPEG, in the sidecar for a RAW - so a file never has its keywords in one place and its stars in another.
Editing several at once
With a group picked out in the filmstrip, File info edits all of it. A field the photos disagree on is marked as mixed and is left exactly as it is unless you type in it - so setting the city on twelve photos does not flatten their twelve different titles.
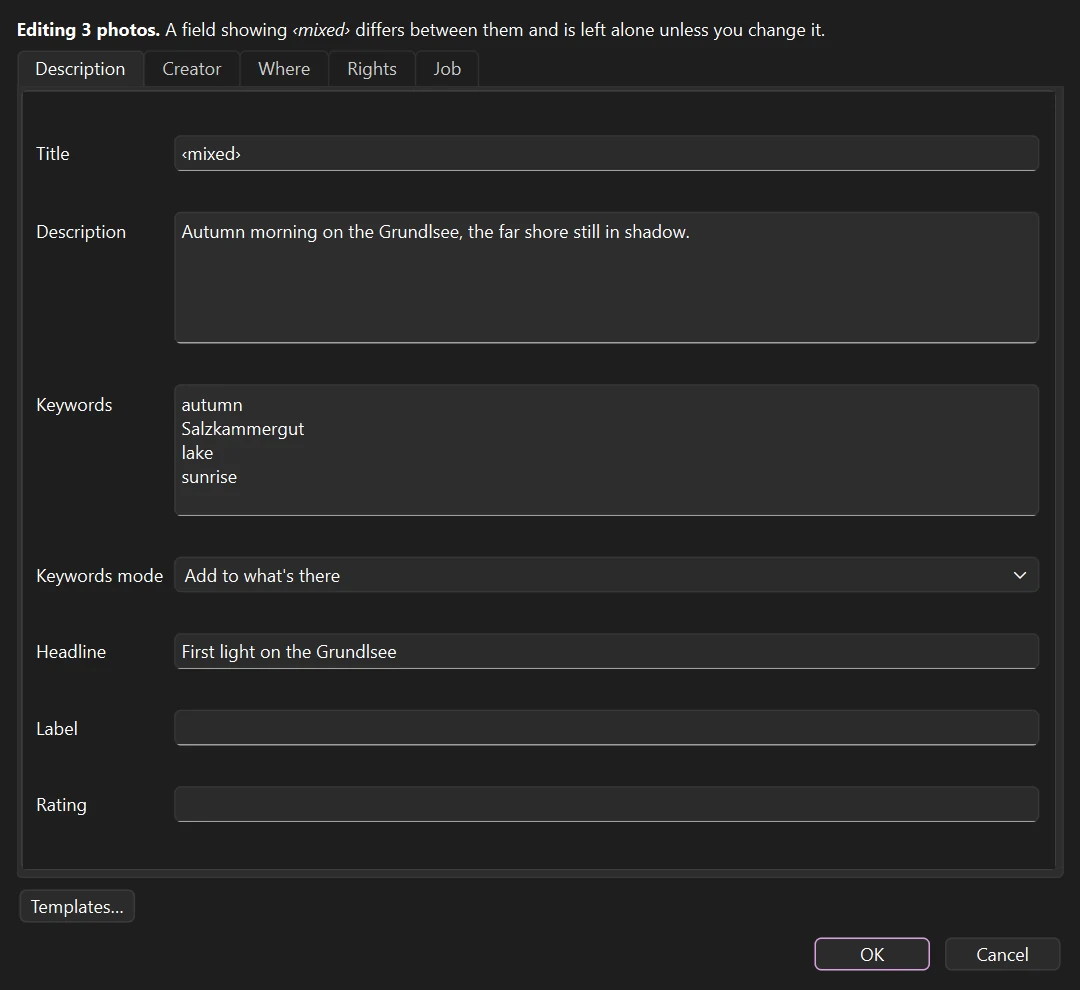
Keywords have three modes. Add, the default, puts yours alongside what each photo already has; Replace swaps them; Remove takes yours out. Templates saves a set of fields - your copyright line and contact details - to apply with two clicks. The whole edit, however many photos, is a single Ctrl+Z.
Metadata → Import from JSON takes a file produced by your own tooling, shows you what it would change and what it could not find, and only then writes. Export to JSON writes the same format back out, so metadata can round-trip through a script.
Searching by what is in the pictures
The box in the toolbar searches the photographs, not the filenames. Type motorcycle and press Enter, and the frames with motorcycles in them come to the front. The vocabulary is open - stars over a lake and red car at sunset work just as well, because nothing here is matching against a list of words.
Nothing is indexed until you search. The first search of a folder reads it once - the magnifying glass turns into a spinner while it does - and writes a small index beside the photos. After that, searching is instant, and only photos that have changed are read again.
Nothing leaves your computer. The search runs on your machine, on your files. That is also why it needs a one-off download the first time you use it - about 156 MB of model, kept on this computer afterwards. It comes from CoolCroco's own downloads, and every file is checked against a known fingerprint before it is used.
Results are ordered, never cut off: every photo keeps a score and the best matches come first, because how well something matches is only meaningful compared with the other answers to the same question. Clear the box to go back to the normal order. A search and a filter work together - filter to one lens, then search inside it.
It is good at objects, animals, vehicles, landscape, weather, the night sky, colour and rough composition; less good at telling one species from a similar one, at specific landmarks and at counting things. It does not read text in a picture, and it does not do people: CoolCroco has no face recognition and is not going to.
Undo and redo
Ctrl+Z steps back through everything you did to files in this session, and Ctrl+Shift+Z puts it back: ratings, approve and reject, rate-and-file, group moves and copies, rotations, and EXIF removal. Each undo reports what it just reversed.
A photo that has left the folder by other means - you moved it in Explorer, or emptied the subfolder yourself - is simply skipped rather than failing loudly.
Rotating for print
R turns the photo a quarter clockwise, Shift+R anticlockwise. The file on disk is turned, not just the view.
Menu → Rotate also has the pass a print run needs. All landscape and All portrait turn only the photos facing the wrong way, so a mixed folder comes out uniform for the paper feed - photos already facing the right way are left untouched. Revert rotations puts the whole folder back the way it arrived, after the run.
Pixels really move, because print machines ignore the EXIF orientation flag - flipping only the flag would fail exactly where it matters. JPEGs are re-encoded with their own original quantisation tables, so a rotate costs well under 1% of file size rather than visible quality; and where only the orientation flag is wrong, as on every phone shot, nothing is re-encoded at all. What changed is recorded in a single CoolCroco-rotations.json per folder - one small file, not one per photo - which is what makes Revert rotations work even after you close the app.
Raw exposure
Menu → Settings → Raw exposure. Raw files only: a JPEG arrives already rendered, and so does the small JPEG the camera writes inside every raw - which is what the filmstrip shows you.
| Closer to the camera | The default. A fixed lift towards your camera's own rendering - the same curve on every frame, so two shots taken a second apart still look like two shots taken a second apart. The highlights roll off instead of clipping. |
| As shot | The absence of an opinion: the exposure you took, developed and left alone. A frame you deliberately underexposed stays dark. |
| Brighten each photo to suit | Lets LibRaw choose a gain per photograph. Fine by daylight and wrong on anything deliberately dark: on a night sky the brightest pixels are dim stars, so the frame is scaled until the stars are white and the sky comes up grey with them. |
The colour behind the photo
Menu → Settings → Background, as a row of swatches. Black is right for judging a bright frame and the worst surround for a dark one - a photo's own blacks disappear into it and every shadow reads as crushed, so you reject frames that were fine.
| Charcoal | Photoshop's own canvas default, near enough. Neither it nor Lightroom defaults to pure black, and this is why: a little light in the surround steadies your eye between frames. |
| Dark grey · Mid grey | Photoshop's Dark Gray and Medium Gray. Mid grey is roughly the neutral a print studio appraises against, and the one to reach for when a frame is mostly shadow. |
| White | Not decoration - it is the only way to see what a photograph will look like on paper, which is a different picture from the same file on black. |
Weighted towards the dark end on purpose: the rest of this window is nearly black, so a bright surround has black chrome around it and reads as a mistake rather than a choice. Your choice is remembered.
Print size
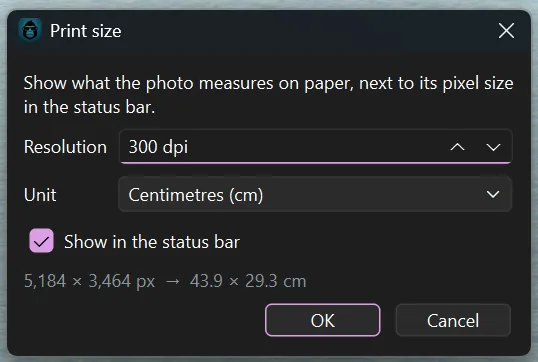
Menu → Settings → Print size sets the resolution and unit used for the paper measurement in the detail bar. A lab working at 300 dpi in centimetres and someone preparing web images at 72 dpi want different numbers from the same file, so this is set once and remembered. Untick Show in the status bar to hide it again.
Properties and EXIF
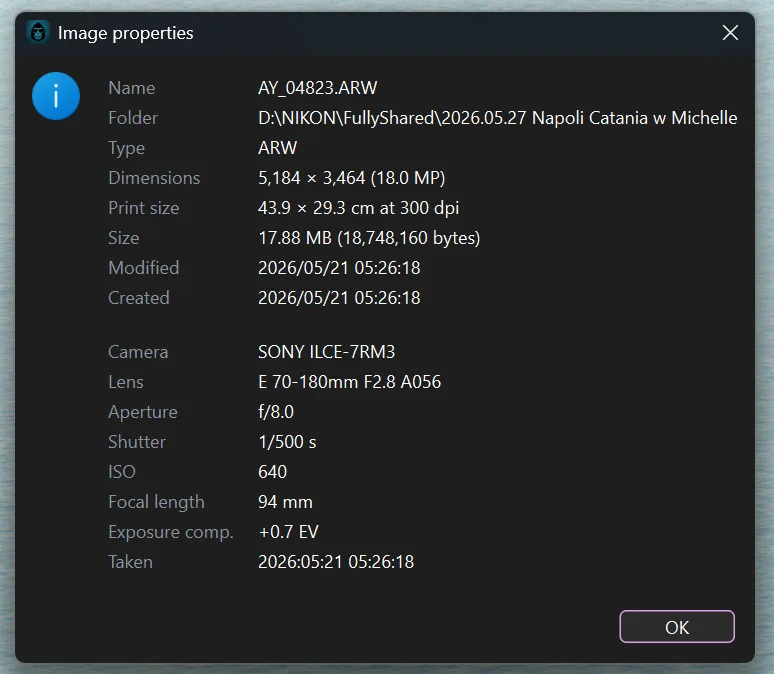
Alt+Enter opens everything the file knows about itself: name, folder, type, pixel dimensions and megapixels, print size, bytes, modified and created dates - then the camera block: body, lens, aperture, shutter, ISO, focal length, exposure compensation and the moment it was taken.
Properties and EXIF
Alt+Enter opens everything the file knows about itself: name, folder, type, pixel dimensions and megapixels, print size, bytes, modified and created dates - then the camera block: body, lens, aperture, shutter, ISO, focal length, exposure compensation and the moment it was taken.
Removing EXIF data
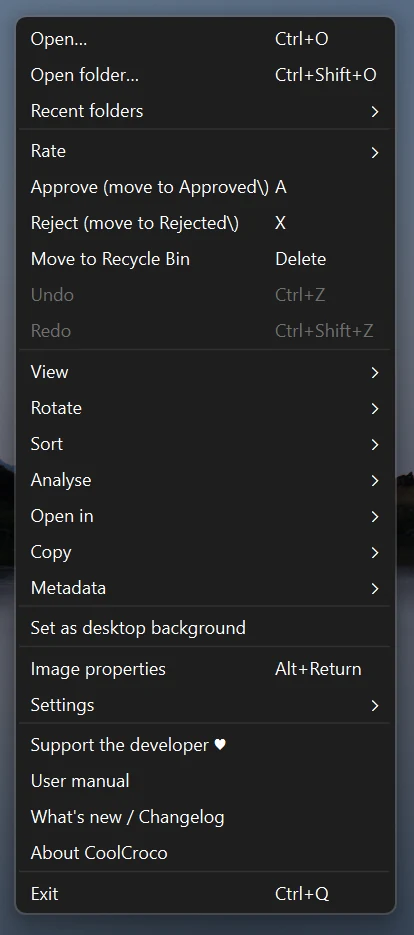
Menu → EXIF data → Remove EXIF data. Tick what should go - GPS location, camera, lens and serial numbers, capture settings, date and time, software, artist and copyright - and it is stripped from the open photo. Groups the file does not carry are greyed out, so you can see at a glance whether a photo is even carrying its location.
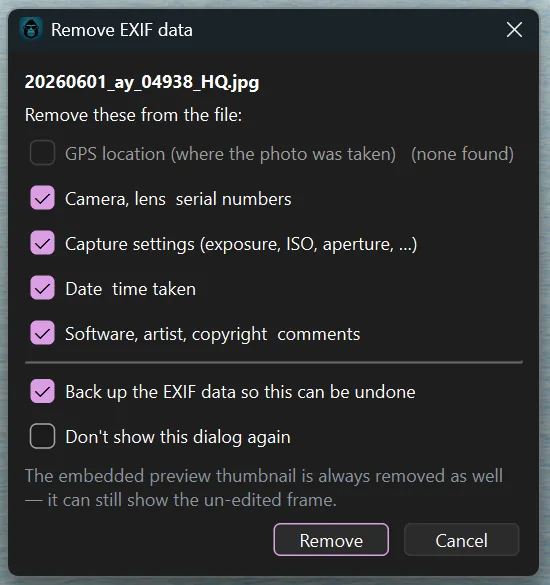
- Pixels are never recompressed. Only the JPEG's EXIF segment is rewritten; the compressed image data is copied through byte for byte.
- With the backup box ticked, the original EXIF is saved beside the photo. It travels with the file when you approve or reject, and goes to the Recycle Bin with it if you delete.
- Recover EXIF data puts it back from that backup. Unlike undo, it still works on a photo you stripped days ago.
- Don't show this dialog again makes later removals happen in one keystroke with the same choices. Bring the prompt back with Ask before removing EXIF in the same menu.
JPEG only, on purpose. RAW and TIFF are refused: rewriting a proprietary RAW container risks the original, and TIFF keeps its EXIF in the file's own directory, so removing tags would mean rewriting the whole image. The embedded preview thumbnail is always removed as well - it can still show the un-edited frame.
Opening in another app
Menu → Open in. The first time, pick your editor; it is remembered by name after that, and Change external editor swaps it. Give it a key in the shortcuts dialog and a photo goes to Lightroom or Photoshop with one press. Open with hands the photo to the system's own chooser for a one-off app, and L opens the photo's location - Explorer with the file selected, Finder on macOS, the containing folder on Linux. If another program rewrites a photo you have open, CoolCroco notices when you come back to the window and reloads it.
Opening in another app
| Open in editor | Menu → Open in. The first time, pick your editor; it is remembered by name after that. Give it a key in the shortcuts dialog and a photo goes to Lightroom or Photoshop with one press. |
| Open with… | Hands the photo to Windows' own Open with chooser for a one-off app. |
| L | Open the photo's location - Explorer on Windows with the file selected, Finder on macOS, the containing folder on Linux. |
If another program rewrites a photo you have open, CoolCroco notices when you come back to the window and reloads it, so what you see is never a stale copy of a file you just edited elsewhere.
Making the keys yours
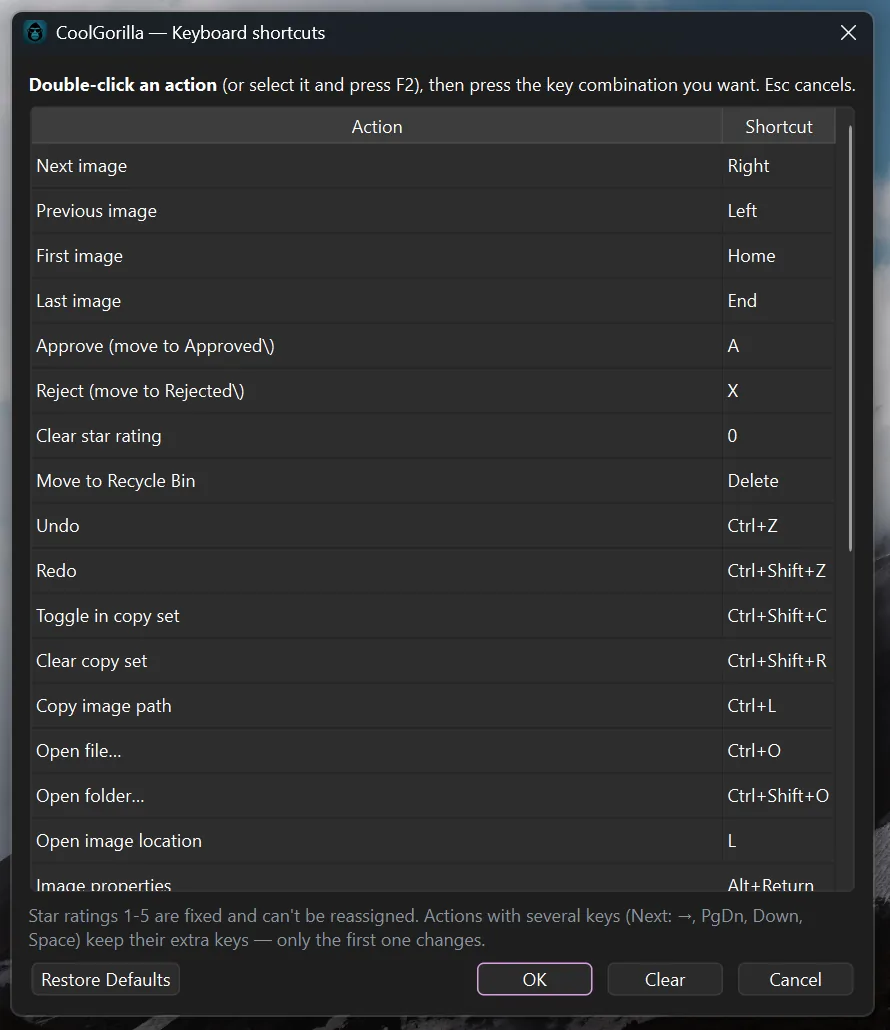
Menu → Settings → Keyboard shortcuts. Double-click an action, or select it and press F2, then press the combination you want. Esc cancels, Clear leaves an action with no key, and Restore Defaults puts everything back. Changes take effect immediately - there is no restart.
- Actions with several keys - Next is the right arrow, PgDn, Down and Space - keep their alternates; only the first key changes.
- The rating keys 1–5 and Shift+1–5 are fixed and cannot be reassigned or taken by something else.
- A key already in use is refused the moment you press it, naming the action that has it.
- Remove EXIF data, Recover EXIF data, Open with and Open in editor ship with no key at all - assign them here if you use them often.
All keys
| Key | Action |
|---|---|
| → PgDn ↓ Space | Next photo (wraps around) |
| ← PgUp ↑ | Previous photo |
| Home · End | First · last photo |
| 1–5 | Star-rate the photo |
| 0 | Clear the rating |
| Shift+1–5 | Rate, and move to the matching Approved star folder |
| A | Approve - move to Approved |
| X | Reject - move to Rejected |
| Delete | Move to the Recycle Bin (asks first) |
| Ctrl+Z · Ctrl+Shift+Z | Undo · redo |
| Ctrl+A | Pick out every photo in the filmstrip or grid |
| Ctrl+Shift+C | Add to or remove from the clipboard |
| Ctrl+Shift+R | Clear the clipboard |
| Ctrl+L | Copy the photo's path |
| R · Shift+R | Rotate right · left |
| Ctrl+0 · 1 · 2 | Fit · actual size (100%) · fill |
| Z | Sticky zoom across frames |
| G | Grid - the whole folder at once |
| T | Show or hide the filmstrip |
| Shift+T · Ctrl+Shift+T | Move the filmstrip round the window, and back the other way |
| Ctrl+B | Show or hide the folder browser |
| Ctrl+F | Filter the gallery |
| Ctrl+I | File info: keywords, copyright, location |
| F · F11 | Fullscreen · fullscreen, image only |
| Esc | Leave fullscreen, otherwise quit |
| L | Open the photo's location |
| Alt+Enter | Properties, with EXIF |
| Ctrl+O · Ctrl+Shift+O | Open files · open a folder |
| Ctrl+W · Ctrl+Q | Quit |
What CoolCroco writes, and where
Nothing is written inside your photos except when you explicitly rotate one or remove its EXIF. Everything else lives beside them:
| IMG_0001.xmp | The star rating, in the format Lightroom and Bridge already use |
| IMG_0001.exifbak | The EXIF you removed, kept so it can be put back |
| CoolCroco-rotations.json | One per folder: what was turned and which way, so a print run can be reverted |
| Approved\ Rejected\ | Subfolders created next to your photos when you cull. Files are moved into them - never deleted. |
Preferences - sort order, print size, your shortcut changes, the remembered editor - are stored per user, outside your photo folders.
Updates
The version from this website checks for a new release on startup and offers it; turn that off under Settings → Check for updates on startup. The Microsoft Store version updates through the Store. Menu → What's new shows what changed in each release.